Our love affair with the future of food and drink

IBM's Watson will control an automated system, delivering unique meals from start to finish without our assistance

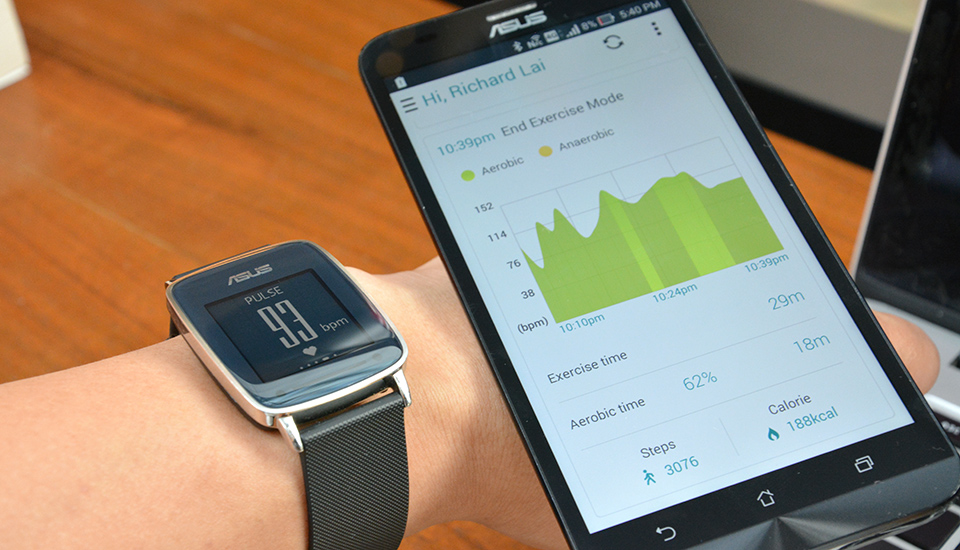
ASUS VivoWatch review

a fitness watch with style and shortcomingsa fitness watch with style and shortcomings

Microsoft HoloLens review

Very high build quality Hologram resolution is impressive Spatial sound is excellent

Jabra's wireless Coach headset

The headphones will be hitting stores in just a couple of weeks time for the price of $149

Faktor-faktor penting sistem Server

Detail arsitektur dan teknologi yang membangun sebuah server

Showing posts with label Tutorials. Show all posts

Monday, 14 September 2015

After Migrate your Hosting for DUMMY

Hi all, do you have a problem like i do when migrating your hosting, here's my experience when i'm moving my hosting from third-party to my own hosting. Dependencies in this tutorial is:
1. You have your own Cpanel login
2. Make sure you have capabilities to change permissions in your folder (not only public_html folder)
3. Make sure your new IP hosting already resolved.
4. Please make sure you already have backup for:
     - Home Directory
     - SQL Database
     - Email Responders


Okay, this the problem i had when migrating my hosting.  I already restoring all my backup such as Home Directory, SQL Database, and Email Responders to my new hosting, and checked that my hosting already resolve to my new IP hosting:: for resolve IP you also can check with this tcpiputils :: But when i open my website it won't show up any content and the web show a caution like this:


then i'm googling for find out the what's the problem, This is my step-by-step to solve this kinda problems:
1. OPEN CPANEL
     go to FILE -> FILE MANAGER
   go to Document Root For :


2.  After Open new windows or new TAB, you will see a directory tree 
     Make Sure you change the permission with the 755 this directory (pubic_html),

3. You may click the icon KEY (CHANGE PERMISSION)  at above directory listing, after highlight the directory, this icon will appear to be click
4. Now testing your site, is there still appear a forbiden warning

That's it, my recent problem. You may always visit my blog to find out if another posting about a large-medium-or tiny problem that i had and resolved.


Thursday, 25 June 2015

INSTALL GAMMU on CENTOS 6.5 (FINAL)


This is tutorial about how to install gammu software. Gammu its an add on software for run GSM modem. so you can send TEXT with blasting methods. Of course in this tutorial i don't explain how to integrate from gammu log file into php script. I hope everyone can understand. Okay, this is the step by step


PLEASE MAKE SURE you already install GAMMU with basic server option, and you can add an "Development Tools" from yum also, for this i can explain in third step.

1. Install cmake – for compile gammu software
# yum install cmake

2. Download file Cmake
# wget http://pkgs.fedoraproject.org/repo/pkgs/cmake/cmake-2.8.7.tar.gz/e1b237aeaed880f65dec9c20602452f6/cmake-2.8.7.tar.gz


3. Install groupinstall “Development tools”
# yum groupinstall “Development Tools”
# yum install alsa-lib mesa-libGLU-devel freetype-devel libmng-devel libpng-devel
# yum install libXt-devel libXft-devel libXrandr-devel libXcirsor-devel libXi-devel libXinerama-devel
# yum install mysql mysql-bench mysql-connector-java mysql-connector-java mysql-connector-odbc mysql-devel mysql-embedded mysql-embedded-devel mysql-libs mysql-server mod_auth_mysql php-mysql qt-mysql

4. Extract and Install Cmake
[root@server ] # tar –zxvf cmake-2.8.7.tar.gz
[root@server cmake-2.8.7] # ./configure

after finished
[root@server cmake-2.8.7] # gmake

ps: make sure last two command run in [cmake-2.8.7] folder

5. Download gammu files 1.33
#wget http://sourceforge.net/projects/gammu/files/gammu/1.33.0/gammu-1.33.0.tar.gz

6. Extract gammu files 1.33

# rpm –Uvh gammu-1.33.0.tar.gz
# ./configure
# make test
# make install

The file gammu will be in directory: /usr/local/bin/gammu
see list program with ls command
# ls /usr/local/bin/

gammu gammu-config gammu-smsd
gammu-smsd-inject gammu-smsd-monitor jadmaker

please make sure you have all the file in that directory

7. Run gammu-config
# /usr/local/bin/gammu-config

add gammurc in folder :::
# touch /usr/local/bin/gammurc
edit file gammurc

[gammu]
port = /dev/ttyUSB0
#model =
connection = at115200
#synchronizetime = yes
logfile = /usr/local/bin/gammu
#logformat = textall
#use_locking = no
#gammuloc =
commtimeout=30
sendtimeout=30
send=1
receive=1
checksecurity=0
deliveryreport=sms
deliveryreportdelay=30
# Database backends congfiguration
#user =
#password =
#pc =
# pc can also contain port or socket path after colon (eg. localhost:/path/to/socket)
#database =
multiparttimeout=3000
To find the device port, please connect your GSM modem and find port with command ::
# dmesg |grep tty

8. ADD this link file for gammu work properly
# ln -s /usr/local/lib64/libGammu.so /usr/lib64/libGammu.so.7
# ln -s /usr/local/lib64/libgsmsd.so /usr/lib64/libgsmsd.so.7

9. Testing
# /usr/local/bin/gammu –identify

Device : /dev/ttyUSB0
Manufacturer : Wavecom
Model : MULTIBAND 900E 1800 (MULTIBAND 900E 1800)
Firmware : 651b09gg.Q2406B 244 041410 13:45
IMEI : 350965720019130
SIM IMSI : 510891574215039


If you see the device, manufacturer etc... your gammu software is working properly, the next step is configure your gammurc file with mysql, i'm sorry i can't explain the step by step for that.


10. Create shortcut gammu
# nano /root/.bashrc
add this line

# Alias gammu command
alias gammu='/usr/local/bin/gammu

Little Tips When your network icon is Missing

This morning i have a little shock when opening my laptop, and i can't see the network icon in my bottom right screen. Ussualy it's show when connected or disconnected then i figure out that maybe the checklist in network properties are not selected. BUMP !! after i open the network properties, it doesn't have check box like windows 7 or windows xp.


Then i more little dizzy, after that i remembered to open the taskbar properties, maybe it's selected hide.
hide inactive icons -- customize
All icon behavior in bottom right taskbar


Then, upss.... it doesn't look any network icon there... the funny is.. i had missed the check box  under the customize, what a silly this morning...  this is it. where you have to thick the check box


 note: if the check box cannot selected, you may restart your laptop / PC


Monday, 27 October 2014

Review Windows 8.1 on LUMIA 620 -- updating Lumia Amber to Lumia Cyan


Dua hari belakangan ini saya memutuskan untuk melakukan UPDATE lumia 620 saya. 
Sebelumnya setelah pertama kali beli baru sekali update, dan proses nya tidak mencantumkan informasi yang jelas apakah proses update berjalan atau tidak yang ada hanyalah [ DUA gear besar dan kecil ] yang berputar-putar.

double gear
Double Gear Icon 1st Update LUMIA 620
 
Makanya sejak peristiwa melelahkan dan berdebar-debar tersebut, saya paling enggan untuk meng iyakan notifikasi update yang terus muncul tiap pagi.

Namun semenjak keluar pengumuman dari microsoft bahwa windowsphone 8.1 sudah tersedia untuk LUMIA 620 dan di negara INDONESIA, dan setelah browsing-browsing segala kendala dan hal-hal apa saja yang akan mengganggu fungsi LUMIA saya (dari PHOTO, BROWSING, SOCIAL MEDIA dan yang paling penting :: HERE MAPS !! -- ini yang tidak disediakan android. ) Dengan LUMIA 620, kita bisa menggunakan HERE MAPS maupun HERE DRIVE tanpa DATA SELULAR, itu merupakan nilai ++ dari LUMIA.


Spesifikasi lumia saya sebelum update
1. Update LUMIA AMBER 
2. SDCARD 8GB Sandisk (black) -- Free Space 4.15GB
3. Free Space internal : 1.45GB


Nah 2 hari sebelum post ini, saya memutuskan untuk melakukan upgrade. berikut langkah-langkah yang saya lakukan.


  • Aktifkan Wifi dan silakan OFF paket Data anda (tidak akan saya jelaskan disini)
  • Pilih --> Setting -- Extras +Info ; dan update pertama saya hanya LUMIA AMBER 
lumia amber
image  cdn.pocketnow.com

  •  Pilih --> Setting -- Phone Update -- Check for updates

windowsphone update

  • Klik check for update, dan silakan tunggu sampai ada notifikasi untuk download update
  • Tunggu beberapa saat hingga proses download dan installing selesai, dalam kasus saya sekitar (1jam) untuk update dari LUMIA AMBER --> LUMIA BLACK
  • Handset anda akan melakukan restart (2X) dan muncul icon classic (DUA GEAR berputar) namun saat ini sudah ada progress bar (ini lah yang menjadi titik terang proses Update) ! setelah restart
  • Setelah mendapatkan update LUMIA BLACK, saya mengulangi langkah diatas, dan diharuskan update kembali 
  • Ternyata masih LUMIA BLACK
  • Lalu dengan bersabar, saya ulangi langkah diatas kembali, kali ini dengan penuh kesabaran soalnya memakan waktu hingga (2.5 jam) . Kurang tahu juga apa, karena bandwidth wifi yang digunakan hanya share 1MB atau memang proses update ke device lumia yang memakan waktu lama
  • Setelah Restart dan muncul icon classic, maka saya cek di Setting -- > Extras + Info. Dan... it's LUMIA CYAN

lumia cyan update
  • Karena masih awam, saya melihat desktop windowsphone, ko' masih dengan tile yang sedikit? ternyata ada setingan khusus untuk memperbanyaknya. Setting --> start + theme, trus pilih ON  bagian Show more Tiles

windows phone tile custom

  • Nah setelah itu barulah bagian DESKTOP akan berubah seperti INI :D


windows phone 8.1 tile
....Cukup Ramai Bukan...


Untuk sementara ini dulu langkah-langkahnya... nantikan selanjutnya untuk review kelebihan dan kekurangan windows phone 8.1 dari kacamata thepriyayi.blogspot.com. 

Selamat membaca... :D


Thursday, 23 October 2014

SHRINK OS BLACKBERRY -- CURVE 9300

Mari Berbagi.

Pengalaman menarik ini setelah berkecimpung dengan sedikitnya kapasitas memory internal BB 9300 Curve 3G yang sangat minim, cuma 256MB !! rinciannya begini:

1. Blackberry OS 6 --> hampir 148MB
2. BBM 6 --> cuma 6 MB
3. YM --> cuma 5MB
4. WA --> paling gede klo dah d ekstrak dr BBworld sekitar 25MB
5. Maps + Others (biasanya gitu di options application management details) --> 62MB

alhasil ludes dah sisa memory internal sisa paling 5MB buat browsing situs2 blogspot si bisa aja, begitu situs yg ga punya mobile site, langsung dah. cannot load this page to large blablabla....

jadi solusinya setelah browsing2 di antero GOOGLE -- Pake shrink OS + restore backup + Install BBM 8.0 + Install YM + Install WA

Persiapan:
1. Jangan pernah lupa blackberry ID
2. Buka Blackberry Protect -- Back Up Now (lebih baik terhubung dengan wifi) klo belum ada app.nya instal laa
3. Install Blackberry Desktop Software -- Sambungin dengan kabel data, Device -- Backup
4. Download Blackberry OS (kebetulan lg pake 9300) ama kartu telkomsel, jadi download di: https://swdownloads.blackberry.com/Downloads/entry.do?code=36A16A2505369E0C922B6EA7A23A56D2

5. Download bbhtool-pub_V2 di:
http://www.4shared.com/file/z68Y1-DE/BBHTool-pub_v2492.html


6. ikutin langkah2 nya di:
http://forumdukungan.blackberry.com/t5/BlackBerry-Curve/Memory-Low-BB-Curve-3G-OS6/td-p/22869


6.1. Kalau di situs d atas dibilang hapus vendor.xml

7. Trik::: "jangan hapus file VENDOR.XML" karena pas mau diinstall ke BB suka ga ngebaca service booknya, jadi ga bisa di NEXT
8. Restore backup semua,
9. Lihat aja semua contact Balik semua kecuali kontak BBM (yg ga linked ama ph. number contact) ama group2
10. woles gan...
12. secara di point no.5 BB OS nya masih mendukung BBM 5.0
13. Asal ga lupa blackberry ID setting aja semuanya masukin blackberry ID ke settingan BBM 5.0
14. Upgrade BBM 5.0 ke BBM 8.0
15. Jika tidak ada kendala backup maka kontak dan semua group akan kembali seperti semula, tapi dengan tampilan baru BBM 8.0  Kereeen....


perhatikan proses BACKUP, baik yang via blackberry protect maupun via Desktop Software pastikan berakhir sukses.


Downgrade BBM 8 --> BBM 7


Buat yang doyan ngoprek BB nya. Dan ini terjadi saat saya sedang menginstall ulang BB. Kali ini yang saya pakai ialah Blackberry Curve 9300. Setelah semua saya reset (* tidak akan saya bahas disini) saya mencoba memasang BBM 8. Tapi alhasil yang terjadi BBM tersebut memang WAH !! FULL animasi. 


Tapi ternyata, LEMOT nya bukan main. Maka saya putuskan untuk mendowngrade fitur BBM nya saja yang dari BBM 8 ke BBM 7 (asli bawaan pabriknya). Berikut langkah-langkah yang saya lakukan (tentunya setelah membackup, dengan BLACKBERRY DESKTOP PROGRAM).

Syarat Utamanya: AKTIFKAN PAKET BB FULL SERVICE / Terhubung WIFI


1. Buka BB browser anda ketikan http://www.blackberry.com/messenger lalu secara otomatis akan terbuka halaman baru sesuai dengan Versi OS HP BB anda. Untuk OS 5,6 n 7 akan langsung secara otomatis dipilihkan BBM versi 7 lalu akan ada pilihan continue,close conenction dan view certificate, anda pilih continue
2. Download BBM versi 7
3. Pilih Jenis Bahasa 
4. Download


5. Tunggu sampai selesai -- kemudian restart BBM
6. Restore semua contact via BBM via BLACKBERRY DESKTOP SOFTWARE atau BLACKBERRY PROTECT